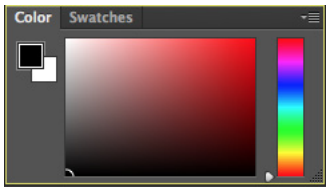
Color, Swatches, Style The Color palette (Figure 4) displays the current foreground and background colors and RGB values for these colors. You can use the sliders to change the foreground and background colors in different color modes. You can also choose a color from the spectrum of colors displayed in the color ramp at the bottom of the palette.
In the Swatches palette (Figure 5) you can choose a foreground or background color and add a customized
color to the library.
The Styles palette (Figure 6) allows you to view, select, and apply preset layer styles. By default, a preset style
replaces the current layer style. You can use the styles in the palette or add your own using the Create New
Style icon.
History
The History palette (Figure 7) stores and displays each action performed allowing you jump to any recent stage
of the image alteration. The alterations should be created during the current working session. After saving or
closing the document, the History palette clears all the contents. Each time you apply a change to an image, the
new state of that image is added to the palette. It is important to know that once you click on any of the previous
stages, all the changes that were made after it will be lost.
Adjustments
The Adjustment layers palette give you the ability to apply an effect to a group of layers in Photoshop, and then
you can edit that effect later, while preserving the original layers.
Layers
Layers let you organize your work into distinct levels that can be edited and viewed as individual units. Every
Photoshop CS6 document contains at least one layer. Creating multiple layers lets you easily control how your
artwork is printed, displayed, and edited. You will use the Layers palette (Figure 9) often while creating a document,
so it is crucial to understand what it does and how to use it.
A) Layer Visibility -The eye shows that the selected layer is visible. Click on or off to see or to hide a layer.
B) Layer Locking Options -Click the checkered square icon to lock Transparency, click the brush icon to lock
the Image, click the arrow icon to lock the Position, and click the lock icon to lock all options.
C) Layer Blending Mode -Defines how the layer’s pixels blend with underlying pixels in the image. By choosing
a particular blending mode from the drop-down menu you can create a variety of special effects.
D) Fill -By typing in a value or dragging the slider you can specify the transparency.
E) Opacity -By typing in a value or dragging the slider, you can specify the transparency of the entire layer.
F) Layer Lock -The icon shows when the layer is locked and disappears when it is unlocked. Double-click the
icon to unlock the layer.
G) Layer Options Menu -Click the black triangle to display the following options: New Layer, Duplicate Layer,
Delete Layer, Layer Properties, etc. Some of the options are presented as icons at the bottom of the Layers
palette.
H) Link Layers – Can be used to link layers together.
I) Layer Styles -If a layer has a style, an “F” icon shows at the bottom of the Layers palette. Click the little black
triangle to see style options.
9
J) Layer Mask -Allows you to hide certain parts of the layer, which can then be revealed by using the paintbrush
and the white paint color to expose portions of the layer.
K) Layer Set -This option helps to organize images with multiple layers. Click the icon to create a folder for
several layers.
L) Create New Fill or Adjustment Layer -Have the same opacity and blending mode options as image layers
and can be rearranged, deleted, hidden and duplicated in the same manner as image layers. Click the icon and
select an option to create a new fill or adjustment layer.
M) Create New Layer -Click this icon to create a new layer.
N) Delete Layer -To delete a layer, select a layer in the Layers palette and drag it to the trash can icon, or
select a layer and click the icon.


No comments:
Post a Comment